Shop By Categories
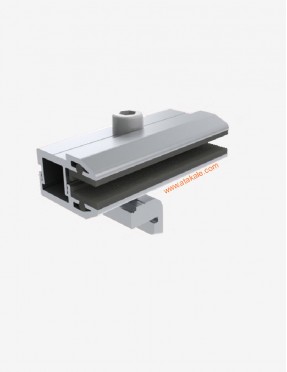
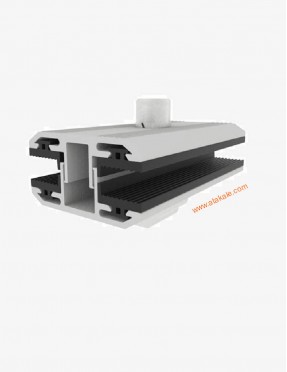
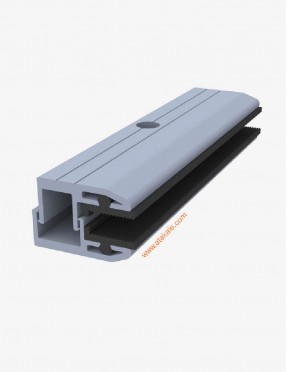
Thin film solar Middle clamp Solar Module Mounting Components 20cm Universal Anodized Aluminum

Thin film solar Middle clamp Solar Module Mounting Components 20cm Universal Anodized Aluminum

Brand:Atakale
Product Code: Ata-Thin-Clamp-Middle-20
Reward Points: 3
SKU : Frameless Mid Clamp 20
Product available in stock : 149
  • 101.10₺

  • Ex Tax: 84.25₺
  • Price in reward points: 30
  • 100 or more 80.88₺
  • 1000 or more 72.79₺
  • 1000000 or more 64.70₺

Available Options


The products can be delivered from the factory, Ankara or Istanbul branch. If you are close to the branches of our company, you can check the stock in our unit close to you by contacting us by phone or e-mail.
Shippment Fee :You can order or order shipping cost. Those who cannot get cheap money from our company.
Dimension 500km 750km1000km+++
Box-Shippment1day2 day 3 day5 day
By Truck3 day 4 day 5 day
7 day
  • Easy to buy & return
  • 100% Secure Payments
  • 24x7 Support Available
  • Shop with our Application

Tags: thin film clamp bifacial clamp

Taksit Tutarı
Toplam Tutar
3 x 52,44 TL
157,33 TL
6 x 28,10 TL
168,58 TL
9 x 20,18 TL
181,59 TL
12 x 16,39 TL
196,72 TL
Taksit Tutarı
Toplam Tutar
3 x 52,44 TL
157,33 TL
6 x 28,10 TL
168,58 TL
9 x 20,18 TL
181,59 TL
12 x 16,39 TL
196,72 TL
Taksit Tutarı
Toplam Tutar
3 x 52,44 TL
157,33 TL
6 x 28,10 TL
168,58 TL
9 x 20,18 TL
181,59 TL
12 x 16,39 TL
196,72 TL
Taksit Tutarı
Toplam Tutar
3 x 52,44 TL
157,33 TL
6 x 28,10 TL
168,58 TL
9 x 20,18 TL
181,59 TL
12 x 16,39 TL
196,72 TL
Taksit Tutarı
Toplam Tutar
3 x 52,44 TL
157,33 TL
6 x 28,10 TL
168,58 TL
9 x 20,18 TL
181,59 TL
12 x 16,39 TL
196,72 TL
Taksit Tutarı
Toplam Tutar
3 x 52,44 TL
157,33 TL
6 x 28,10 TL
168,58 TL
9 x 20,18 TL
181,59 TL
12 x 16,39 TL
196,72 TL
Taksit Tutarı
Toplam Tutar
3 x 52,44 TL
157,33 TL
6 x 28,10 TL
168,58 TL
9 x 20,18 TL
181,59 TL
12 x 16,39 TL
196,72 TL
Taksit Tutarı
Toplam Tutar
3 x 52,44 TL
157,33 TL
6 x 28,10 TL
168,58 TL
9 x 20,18 TL
181,59 TL
12 x 16,39 TL
196,72 TL
Taksit Tutarı
Toplam Tutar
3 x 52,44 TL
157,33 TL
6 x 28,10 TL
168,58 TL
9 x 20,18 TL
181,59 TL
12 x 16,39 TL
196,72 TL

Special clamps produced for such panels are used in the assembly of frameless solar panels. In order to prevent the glass from breaking during the assembly of the glass, the area holding the glass in the middle of the aluminum clamp is covered with a gasket. When the glass is compressed sufficiently, this gasket prevents the direct pressure of the aluminum on the glass and ensures that it does not fall apart during impacts.In the picture below, you can see how to assemble a frameless, tin-film thin-film bifacial solar panel.

Normally you will see that a panel is clamped at 4 points with clamps. The situation is generally the same with the clams of the frameless glass panel. But especially on half cut 455w and above panels, you should assemble it in a way that it will hold clamps from at least 8 points. Especially snow and wind load, since the glass is a brittle material because there is no frame, you have to distribute the pressures and tensions to a single point. You should use a clamp with at least 8cm width and conbta in the installation of bifacial, glass to glass, thin film frameless solar panels. The basic assembly fault of all broken frameless solar panels is the wrong choice and underuse of clamps.


MOUNTING METHOD A CLAMPING

When solar is installed on a typical roof, whether it is tin or tile, rails, also known as racks, are securely fastened to roof rafters.  Panels are laid on top of these rails and held firmly in place with clamps.  While there are other ways of attaching solar panels, including directly bolting them on, clamps are by far the most common method.  Convenience is the main reason, but it is effective and I expect the large majority of correctly clamped panels will still be in place 40 years from now.
Properly clamping panels so they meet the manufacturer’s instructions (and therefore the Australian Standards for installation) involves using the right number of clamps in the right places.  The areas on a panel where clamps can be clenched are known as zones and panels can have more than one type.  If you are interested in learning about clamping zones, what you should check to see if your panels are properly clamped, and what you can do if they’re not, then please read on

Bolts On Roofs Is Nuts
Solar panels can be directly bolted into place and panels will generally come with either four or eight mounting holes for bolts to be placed through.   This method is often used in solar farms to attach panels to ground mounted racks or to solar trackers that follow the sun through the day.  It is possible to use bolts because on a ground mount or a tracker there is plenty of room to get behind the panels and attach them.  But on a roof where panels are laid flat this is not at all easy.
International  standards require a gap of at least 5 cm between roofs and solar panels.  However, in urban areas, panels are generally not allowed to extend more than 10 cm from the surface.  As a typical solar panel is around 4 cm thick, this only leaves a 5 to 6 cm space in which to work.  So directly bolting panels on would require either fancy tools or magic hands to get the job done.

Clamps Rule and Clamp Rules
Because bolts are so bothersome, by far the most common method for permanently perching solar panels upon people’s household canopies of tin or tile is for them to be firmly clenched in the clasp of clamps.
Clenched clamps are clearly the most common category of connector chosen when it comes to cohering panels to racks and roofs and are capable of doing their duty for decades.
But in order for clamps to be effective in holding panels in place in all kinds of weather, there are certain rules that must be followed about where they can go.  These rules involve clamping zone

Clamping Zones
Clamping zones can vary from panel to panel.  Many panels only have one type of clamping zone, which will be located around its mounting holes.  Other panels can have multiple zones which will give an installer options on where to install clamps, depending on what wind conditions are like at a location.
You can find information on your panels’ clamping zones by searching for the brand’s installation manual or installation guide.

As you can see, Atakale’s panels only have one type of clamping zone, which is located around its four sets of two mounting holes.  The mounting holes are, quite sensibly, located in the best positions to anchor a panel.

• A 6mm gap between module frames should be allowed to avoid tension from thermal expansion. 
• The solar module may be mounted using the following methods: (*Torque:8~12Nm )
• When installing modules in heavy snow areas, it is recommended to be taken an appropriate countermeasure to prevent possible damages to
the lower side frame by slipping snow . (e.g. attach supporting part to the lowest modules)
Mounting by using clip or clamps The module may be fastened to a support using clips or clamps on both the long edge and the short edge of the modules. Specific information on the solar module dimensions and location of clipping is provided in Product Specifications .

Mounting by using frame bolts holes
• Secure the solar module to the structure using the factory mounting holes.
• Four M6 stainless steel bolts, four nuts, four spring washers, and eight flat washers are recommended per solar module.
• The module may be fastened to a support using both the outer and inner bolt holes of the frame.
• Each module should be securely fastened at a minimum 4 points on two opposite sides.
• Specific information on the solar module dimensions and location of mounting holes isprovided in ‘Product Specifications’

The more colourful diagram below shows a solar panel with three different clamping zones and is from the Yingli Solar PV Modules Mounting Guide.  Yingli Solar was the world’s largest manufacturer of solar panels and now it’s not.  (If you are going to follow the ups and downs of solar panel manufacturing, make popcorn.  It’s a real soap opera.)
· The mounting method has been qualified by Atakale Solar Inc. as well as certified by VDE and CSA.
· Top or bottom clamping methods will vary and are dependent on the mounting structures. Please follow the mounting guidelines recommended by the mounting system supplier.
· Each module must be securely fastened at a  minimum of four points on two opposite sides. The clamps should be positioned symmetrically. The clamps should be positioned according to the  authorized position ranges defined in table A.
· Install and tighten the module clamps to the mounting rails using the torque stated by the mounting hardware manufacturer. M8 X 1.25  (5/16”) bolt and nut are used for this clamping method.
· Tightening torques should be within 17~23 Nm  (12.5~17.0 ft-lbs) for M8 (5/16”) coarse thread bolts, depending on the bolt class. For the bolt grade, the technical guideline from the fastener suppliers should be followed. Different recommendations from specific clamping hardware suppliers should prevail.
· The system designer and installer are responsible for load calculations and for proper design of support structure. Atakale  Solar Inc.’s warranty may be void in cases
where improper clamps or unsuitable installation  methods are found. When installing inter-modules or end-type clamps, please take the following measures into account:
 Do not bend the module frame.
 Do not touch or cast shadows on the front glass.
 Do not damage the surface of the frame (to the
 exception of the clamps with bonding pins).
 Ensure the clamps overlap the module frame
 by at least 5 mm (0.2 in)
 Overlap in length by at least
 a) 80 mm (3.15 in) when 2400 Pa < uplift load ≤  4000 Pa is required.
 b) 40 mm (1.57 in) when uplift load ≤ 2400 Pa is  required.  Ensure the clamp’s thickness is at least 3 mm  (0.12 in).
· Clamp material should be anodized aluminum alloy or stainless steel.
· Clamp positions are of crucial importance for the reliability of the installation. The clamp centerlines must only be positioned within the ranges indicated in table A, depending on the configuration and load.
· For configurations where the mounting rails run parallel to the frame, precautions should be taken to ensure the bottom flange of the module frame  overlaps the rail by 15 mm (0.59 in) or more.


Thin Film Middle clamp Mounting Components 8 cm Anodized Aluminum
Features

Benefits
For Bifacial Frameless Module
Vibration Safe , Glas To Glass Clamp
High-grade anodized aluminum
PowerRail P6/P8/P14 End Clamp

Pre-assembled, easy to install


Reduced Installation Time and Costs
Withstand different wind snow
Telescoping and One-Piece Tilt Kit
Photovoltaic Module Thickness
Clamp Thickness
Clamp Lenght
25-50mm
1mm-4mm
1mm-6000mm
Custom code GTIP HS Code:76109000

Thin Film Solar Panel Clamps
Thin film solar panel clamps can be used for kinds of specification thin film solar module or glass unframed solar modules. Rubber in middle will protect thin film solar panels well. Appropriate clamping force does not damage solar modules and can prevent the solar panel moving effectively.
Compatible for thin film module, double glass module, framless module thickness 3-8mm.We put bolt head in the hollow part to avoid shading on thin panels.Fixed EPDM rubber sliding off problem.Anodized silver or electrophoresis black is optional.
Our frameless solar panel end clamps is 60 mm / 80 mm / 100 mm … and customized length for options .
It’s suitable for thin film solar panels from 4 mm – 10 mm thickness with our solar end clamps .
The rubber strips inside end clamps can prevent unframed solar modules moving .
It’s UV and Ozon resistancy ,Low electrical conductivity, recycalble, weather resistant.
Advantage of Framless PV module clamps for solar mounting system
Natural anodized / black color in color with alum 6005-T5 extruded
 Frameless end clamp fits for double glass solar PV panels ;
 This end clamps for frameless solar panel mounting is pre-assembled before delivery ;
 EPDM rubber secure hold modules firmly ;
 
Material List for Frameless End Clamp Solar Mounting Components :
Upper part of aluminum parts;
Lower part of aluminum parts;
Rubber strip in the middle of end clamp ;
T sliding nut block;
Hexagonal Socket head bolt;
Spring Washer
How Use it
We are good manufacturer of PV mounting components, we carry more type of end clamps and mid clamp to meet different demand, and always keep enough stock of each component in warehouse, can deliver the cargo within shortest time.
Be sure to avoid shadowing effects from the module clamps. When choosing this type of clamp-mounting method, please be sure to use at least six clamps on each modules, and three clamps should be attached on each long side of the module. Depending on the local wind and snow loads, if excessive pressure load is expected, additional clamps or support would be required to ensure the module can bear the load. The
applied torque should be large enough to fix it steadily (about 16-20 N▪m) .For safety, you’d better follow the clamps manufacture’s recommendation. Please find detailed mounting information in the below illustration, and we suggest the clamps are mounted between J and K, as shown below.
BENEFITS  PERFORMING
Tested by accredited laboratories and qualified by major module manufacturers(1).  Anti-theft designed. 
 QUICK
Fastening in a single operation.
EASY TO USE
Tool-free set up.  Friendly: clips can be inserted from underneath the array, no need to step on the module.  Maintenance free as no torque correction required. 
Minimal training required.  No screw tightening: Minimal risk of breakage.
COST SAVING
Lower overall costs of the PV installation. Lower maintenance costs: Screw-less, no periodic torque control required. 
Hot spot risk reduction and low risk of breakage PV modules thanks to elastic mechanical clamping(2)

Safe support, cost efficient .
PV module clamps for solar mounts are universal and standard mounting system clamp, they are used to install solar panels on solar rails. We provide according to module size. We provide high-quality aluminum to ensure sufficient strength to fix the panel. The universal panel clamp makes it easier to install solar panels. Due to its clever design, it can slide in the rails, saving the trouble of displacement during installation.
The clamp is a component used to fix and ground the module to the bracket and is an integral part of the bracket system. The solar module clamp is universal, high-quality, beautiful, and ultimately saves your time when installing the system.
The design of the component can fix the solar panel to the rail faster and more safely, thus providing a more beautiful installation. The module clamp is specially designed, extruded and designed for each specific module frame. Their innovative clamping system provides inward tension on the module frame to fix the solar panels in the frame. The slot nut is easily slid into place to secure the end clamp and intermediate clamp.
The aluminum solar panel mount end clamp and mid clamp of the aluminum solar panel mount are used to fix the solar panel to the rail. It can be used repeatedly, the scope of use and installation flexibility. Made of aluminum alloy, it has strength and durability. We have conducted on-site tests, meet the standards, and can withstand wind and snow loads of different strengths.
Solar Panel mid clamp 40mm comes with bolt to suit our 4200mm railing system, in order to mount multiple panels in conjunction with end clamps to mount single panels.
Please check profile of panel as these will only fit solar panels  with profile of 40mm, for other sizes please see our other listings.
Mid clamps or brackets are designed to bolt to aluminium rail and be able to slide along for adjustment. Please note these fit our 4200mm railing system (supplied with matching nut) but will also fit other railing systems as long as the nut is changed to suit the rail (not supplied).
Sold individually, 2 rails required for each row of solar panels

• 2560mm Rail, for 3x 800-825mm width panels in portrait layout, HS-8800
• 3405mm Rail, for 4x 800-825mm width panels in portrait layout, HS-8801
• 4200mm Rail, for 5x 800-810mm width panels in portrait layout, HS-8802

Rail splice, HS-8803
Sold individually, required to join two lengths of rail in line
End Clamps, 35mm, HS-8804
Sold individually, required to clamp the end solar panels outer edges to the rails
Mid Clamp, 35mm, HS-8805
Sold individually, required to clamp down the edges of two adjacent solar panels
Tile Roof Hook, HS-8806
Sold individually, attaches the rail to the building frame underneath a tiled roof
Tin Roof Hook, HS-8807
Sold individually, attaches the rail to the building frame underneath a tin roof
Adjustable Tilt Legs:
Sold individually, required for mounting onto a flat roof to obtain correct panel angle
Each back leg requires a front leg to match with it
• Adjustable Tilt Front Leg, HS-8810
• Adjustable Tilt Back Leg 10-15°, HS-8811
• Adjustable Tilt Back Leg 15-30°, HS-8812
• Adjustable Tilt Back Leg 30-60°, HS-8813
NOTE: This is a special order line which is not stocked in all retail stores but can be ordered. Please call your local store to check if they have stock on hand.

Feature:
1. High-grade anodized aluminum;
2. Pre-assembled, easy to install;
3. Withstand different wind and snow loads;
4. Compatible with aluminum bracket of photovoltaic bracket system;
5. Fixed solar panels, excellent stability and safety;
6. Clear, Silver and black different Colar range
7.No anti-seize compound application to threads required- reducing installation time and risk of system failures from misapplication
8. Impact gun friendly clamps allow for fast installation
9.Non-bus bar channel nut used for end clamps and microinverters/power optimizers
10. Slides into all RoofTrac rail sizes from end of rail or inserted from top of rail
11. 30 year materials warranty
12. Roof slope: up to 60°
13.Shrinking Film, Carton, Wooden Pallet or by Custom Transport Package
14.High quality material in Aluminum and SUS 304.
15. Highly corrosion resistant surface treatment.
16.Screws and nuts go with every componts needed
17. Mechanical calculation and reliability tested to ensure highset product quality
18. Vertical or horizontal panel mounting
19.Used both for roof and ground solar projects
20.Strong and comply with AUS/NZ standards
21. Massive design of the click part (jamming and "straightening" when screwing) as well as screw guidance through formed thread.


The solar panel clamp is used to install two solar panels on our rails. The aluminum solar panel mount mid clamp is supplied with bolts to fit our aluminum rails so that multiple panels can be installed with the end clamp. The middle clamp is designed to be bolted to the aluminum rail and can slide for adjustment
Clamp Specification
Clamp Use Type Thin Film Middle
Clamp Meterial Anodized Aluminum
Clamp Coated Silver Anodized
Module Height mm 8mm
Recommended Torque 16-20 Nm
Gap Between mm 20mm
Clamp Screw Bolt M8
Clamp Max Load 1600Pa
Clamp Wind Speed 166km/h
Clamp Tilt Angel 0º-60º
Clamp Certificate AS/NZS1170/JIS4955:2011/ISO9001,DIN 1055, GB50009-2012 ,IBC2009, TUV,JIS C 8955 : 2011, International Building Code IBC 2009 ,California Building Code CBC 2010
Clamp Warranty 25 years
Clamp Application Roof,Ground , Front,frameless, bifacial module
Clamp Snow Loading 1.44kN/m²
Clamp Thermal Expansion 2.35E-05/ ºC (αr)
Clamp Diffusivity 200.00 W/mºK
Clamp Mechanical
Clamp Length mm 200mm
Clamp Wings With mm 40mm
Clamp Thickness mm 4mm
Clamp Mass 150gr

Write a review

Note: HTML is not translated!
    Bad           Good
Captcha
Whatsapp Whatsapp Whatsapp Whatsapp