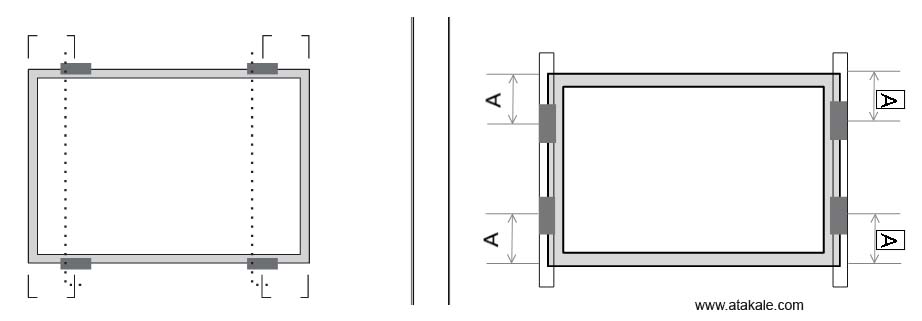
Güneş Paneli Montajı Clamp Bağlantısı Nasıl Yapılır

MONTAJ YÖNTEMİ: CIVATALAMA
Bu montaj yöntemi Atakale Solar . tarafından onaylanmış ve VDE tarafından sertifikalandırılmıştır.
• Modüller, yalnızca arka çerçeve flanşlarındaki montaj deliklerinden destek yapılarına cıvatalanmalıdır.
• Her modül karşılıklı iki taraftan en az 4 noktadan emniyetli bir şekilde sabitlenmelidir.
M8 X 1.25 - Derece 8.8 (5/16”-18 Derece B7) galvaniz veya A2-70 paslanmaz çelik cıvata ve somun kullanılmalıdır. Cıvata ve somunun akma dayanımı, 450 Mpa. Dan fazla olmalıdır
• M8 (5/16”-18) kalın dişli cıvatalar için, cıvata sınıfına bağlı olarak sıkma torkları sırasıyla 17~23 Nm (12,5~17,0 ft-lbs) olmalıdır.
• Ağır rüzgar yükü olan alanlarda ek montaj noktaları kullanılmalıdır. Sistem tasarımcısı ve kurulumcu şunlardan sorumludur:
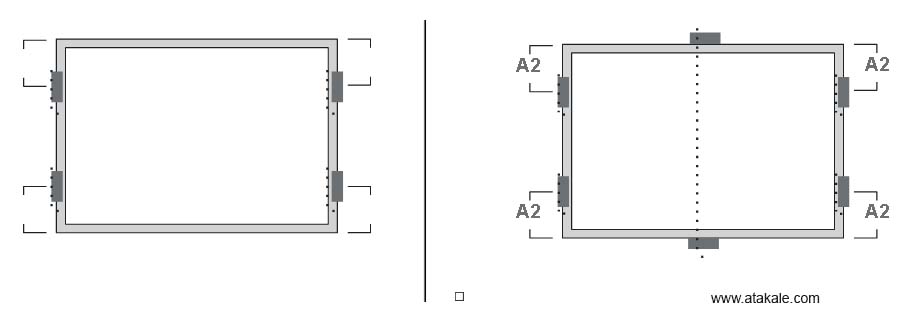
Dört Standart montaj deliği kullanarak kısa çerçeve tarafında cıvatalama. Montaj rayları, uzun çerçeve tarafına dik olarak uzanır. Modülün altına aşağıda gösterildiği gibi ek bir destek çubuğu yerleştirilmelidir.
Maksimum Yük: Kaldırma Yükü ≤ 2400 Pa Baskı Yükü ≤ 5400 Pa Uygun güneş paneli :tipleri: Poli, Mono Bifacial Asya, Avrupa, Amerika bölgeleri için uygun standartlar
En içteki dört montaj deliğini kullanarak uzun çerçeve tarafında cıvatalama. Montaj rayları, uzun çerçeve tarafına paralel uzanır.
Maksimum Yük:Kaldırma Yükü ≤ 2400 Pa Baskı Yükü ≤ 5400 Pa Uygun güneş paneli :tipleri: Poli, Mono Bifacial Asya, Avrupa, Amerika bölgeleri için uygun standartlar
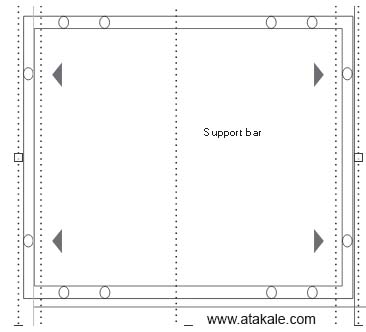
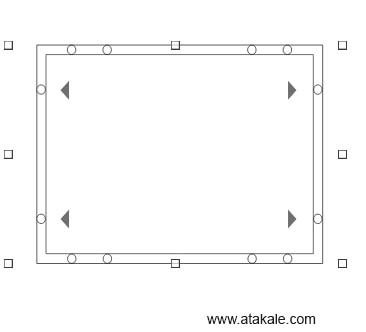
En içteki dört montaj deliğini kullanarak uzun çerçeve tarafında cıvatalama. Montaj rayları, uzun çerçeve tarafına dik olarak uzanır.
Maksimum Load:Kaldırma Yükü ≤ 2400 Pa Baskı Yükü ≤ 5400 Pa
Uygun güneş paneli :tipleri: Poli, Mono Bifacial Asya, Avrupa, Amerika bölgeleri için uygun standartlar.
En içteki dört montaj deliğini kullanarak uzun çerçeve tarafında cıvatalama. Montaj rayları, uzun çerçeve tarafına paralel uzanır.
Maksimum Load:Kaldırma Yükü ≤ 2400 Pa Baskı Yükü ≤ 5400 Pa Uygun güneş paneli :tipleri: Poli, Mono Bifacial Asya, Avrupa, Amerika bölgeleri için uygun standartlar)
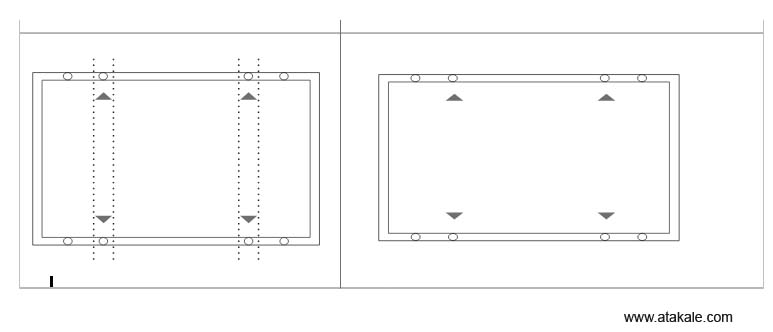
Dört orta montaj deliği kullanarak uzun çerçeve tarafında cıvatalama. Montaj rayları, uzun çerçeve tarafına dik olarak uzanır.Maksimum Load:
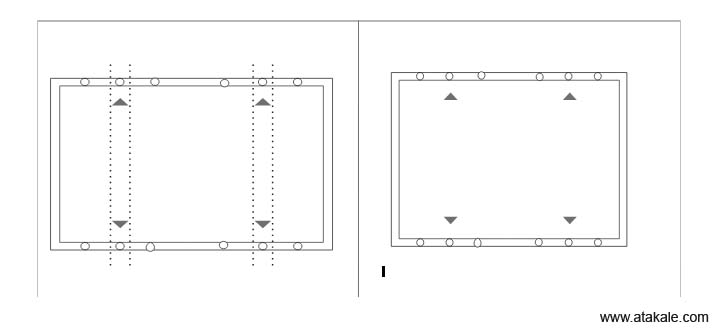
En içteki dört montaj deliğini kullanarak uzun çerçeve tarafında cıvatalama. Montaj rayları, uzun çerçeve tarafına dik olarak uzanır. Maksimum Load:
Kaldırma Yükü ≤ 2400 Pa Baskı Yükü ≤ 5400 Pa Uygun güneş paneli :tipleri: Poli, Mono Bifacial Asya, Avrupa, Amerika bölgeleri için uygun standartlar
Dört orta montaj deliği kullanarak uzun çerçeve tarafında cıvatalama. Montaj rayları, uzun çerçeve tarafına dik olarak uzanır
Maksimum Yük:Kaldırma Yükü ≤ 2400 Pa Baskı Yükü ≤ 5400 Pa Uygun güneş paneli :tipleri: Poli, Mono Bifacial Asya, Avrupa, Amerika bölgeleri için uygun standartlar
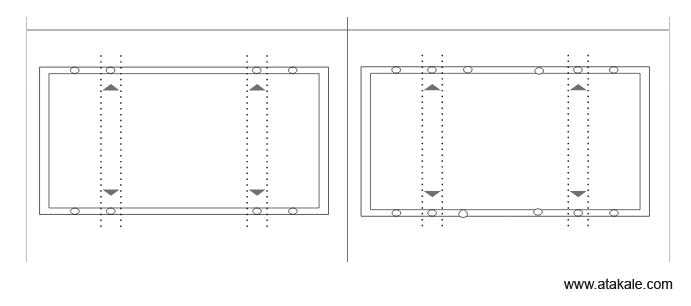
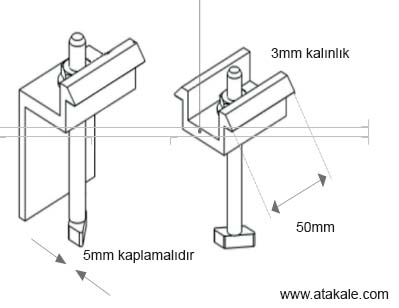
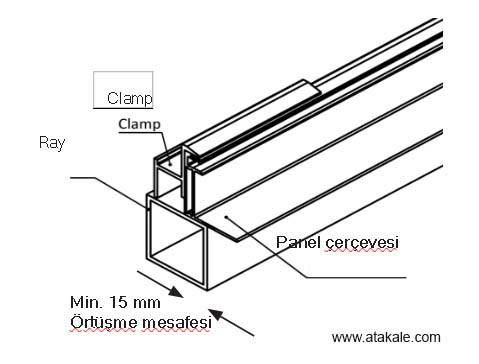
hesaplamalarından ve destek yapısının uygun tasarımından sorumludur. • Kelepçe malzemesi eloksallı alüminyum alaşımlı veya paslanmaz çelik olmalıdır. • Montajın güvenilirliği için kelepçe konumları çok önemlidir. Kelepçe merkez çizgileri, configürasyona ve yüke bağlı olarak yalnızca tablo A'da belirtilen aralıklar içinde konumlandırılmalıdır. · Montaj raylarının çerçeveye paralel uzandığı konfigürasyonlarda, modül çerçevesinin alt flanşının rayla 15 mm (0,59 inç) veya daha fazla örtüşmesini sağlamak için önlemler alınmalıdı.
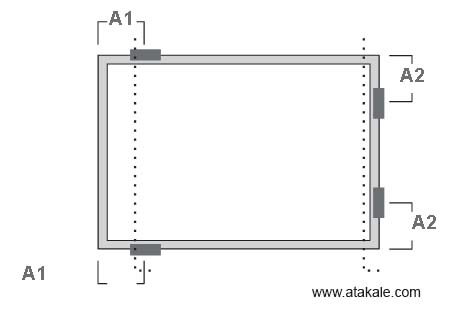
Uzun kenarda dört clamp kullanın. Montaj rayları uzun yan çerçeveye dik olarak uzanır. A1 mesafe = (340 – 550) mm Maksimum Yük Çekme Yükü ≤ 2400 Pa İtme yükü load ≤ 2400 Pa . Uzun kenarda iki kıskaç ve kısa kenarda iki kıskaç kullanın. Montaj rayları uzun yan çerçeveye dik olarak uzanır.
A1 mesafe = (340 – 550) mm Maksimum Yük Çekme Yükü ≤ 2400 Pa İtme yükü load ≤ 2400 Pa A2 mesafesi 200-250mm
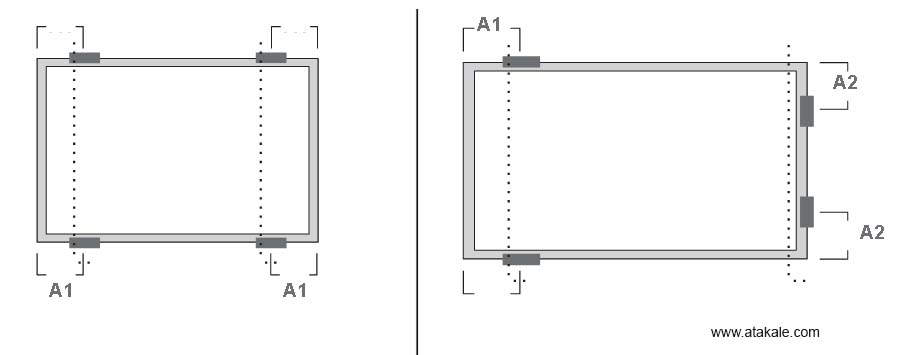
Kısa kenarda dört clamp ve uzun kenarda iki kıskaç kullanın. Modülün merkezinin altına ek bir destek çubuğu yerleştirilmelidir.
A2 mesafe = (200 – 250) mm Çekme Yükü ≤ 2400 Pa İtme yükü ≤ 5400 Pa
Kısa kenarda dört clamp kullanın. Montaj rayları uzun yan çerçeveye dik olarak uzanır. A mesafe = (200 - 250 mm) Maksimum Yük:
Çekme Yükü ≤ 1400 Pa İtme yükü ≤ 1400 Pa A mesafesş = ( 0 - 200 mm) Maksimum Yük: Çekme Yükü ≤ 1200 Paİtme Yükü ≤ 1200 Pa
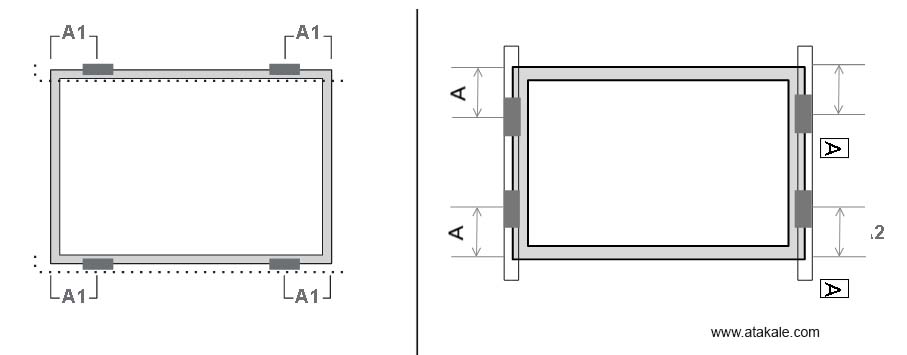
Uzun kenarda dört kıskaç kullanın. Montaj rayları uzun yan çerçeveye dik olarak uzanır.
A1 mesafe = (340 – 550) mm Maksimum Yük: Çekme Yükü ≤ 2400 Pa İtme Yükü ≤ 2400 Pa
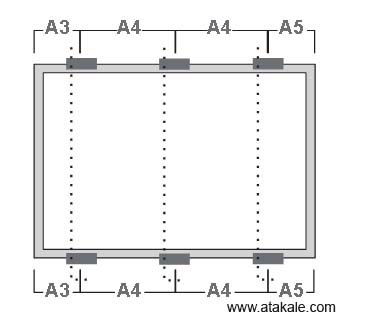
Uzun kenarda altı kıskaç kullanın.Montaj rayları uzun yan çerçeveye dik olarak uzanır.
A3 mesafe = (250– 350) mm A5 mesafe = (250– 350) mm Maksimum Yük Uplift load ≤ 2400 Pa İtme yükü ≤ 5400 Pa Uyarı: Bu yöntem daha iyi güvenilirlik için önerilir.
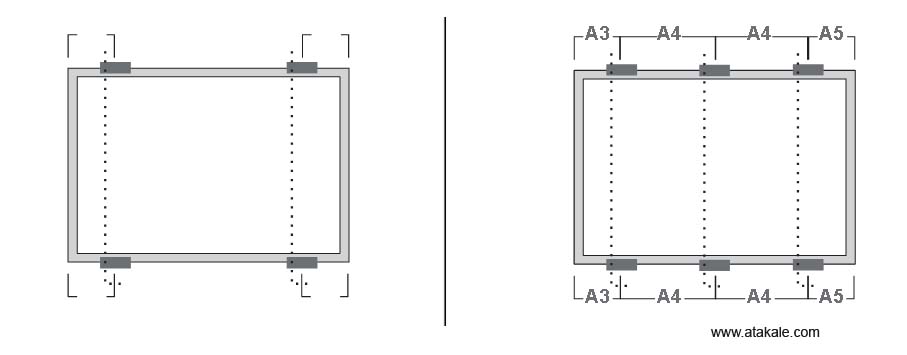
Uzun kenarda dört kıskaç kullanın. Montaj rayları uzun yan çerçeveye dik olarak uzanır. Kısa kenarda dört kıskaç kullanın. Montaj rayları uzun yan çerçeveye paralel uzanır.
A1 mesafe = (0 – 239) mm Maksimum Yük: Çekme Yükü ≤ 2000 Pa İtme Yükü ≤ 2000 Pa
A1 mesafe = (240 – 330) mm Maksimum Yük: Çekme Yükü ≤ 3600 Pa İtme Yükü ≤ 5400 Pa
A1 mesafe = (331 – 550) mm Maksimum Yük: Çekme Yükü ≤ 2400 Pa İtme Yükü ≤ 2400 Pa
Kısa kenarda dört kıskaç kullanın. Montaj rayları uzun yan çerçeveye paralel uzanır.
A2 mesafe = (200 – 250) mm Maksimum Yük Çekme ≤ 2000 Pa İtme ≤ 2000 Pa

Kısa kenarda dört kıskaç kullanın. A2 mesafe = (200 – 250) mm Maksimum Yük: Çekme Yükü ≤ 2200 Pa İtme Yükü ≤ 2200 Pa
A2 mesafe = (0 – 200) mm Maksimum Yük: Çekme Yükü ≤ 2000 Pa İtme Yükü ≤ 2000 Pa
Kısa kenarda dört kıskaç ve uzun kenarda iki kıskaç kullanın. Modülün merkezinin altına ek bir destek çubuğu yerleştirilmelidir.
A2 mesafe = (200 – 250) mm Maksimum Yük Uplift load ≤ 2400 Pa Downforce load ≤ 5400 Pa
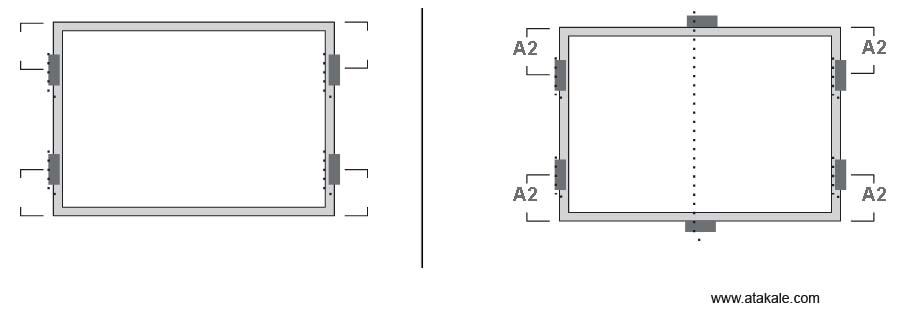
Uzun kenarda dört kıskaç kullanın. Montaj rayları uzun yan çerçeveye paralel uzanır. A1 Mesafe = (240 – 330) mm Maksimum Yük: Çekme Yükü ≤ 2400 Pa İtme yükü ≤ 4000 Pa
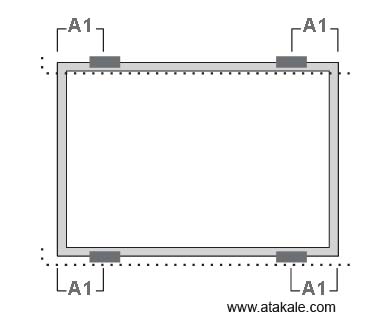
Uzun kenarda dört kıskaç kullanın. Montaj rayları uzun yan çerçeveye dik olarak uzanır.
A1 mesafe = (340 – 550) mm Maksimum Yük: Çekme Yükü ≤ 2400 Pa İtme Yükü ≤ 2400 Pa
A1 mesafe = (410 – 490) mm Maksimum Yük: Çekme Yükü ≤ 3600 Paİtme Yükü ≤ 5400 Pa
